Know Your Status: Self-Testing for HIV, Order Online Pick Up at Convenience Store

Whether you’re straight, gay, or something in between, knowing your HIV status is important so that we can all work towards reducing HIV infections in Taiwan and around the world. Given the stigma that is still attached to this disease, the government has launched a system for ordering HIV self-testing kits which can be delivered to convenience stores across Taiwan.

The steps are pretty simple. First visit this website (a page of the CDC website):
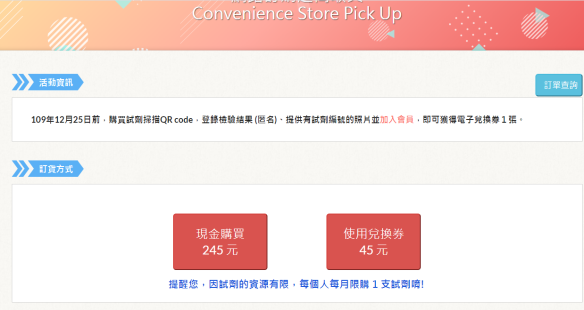
未命名

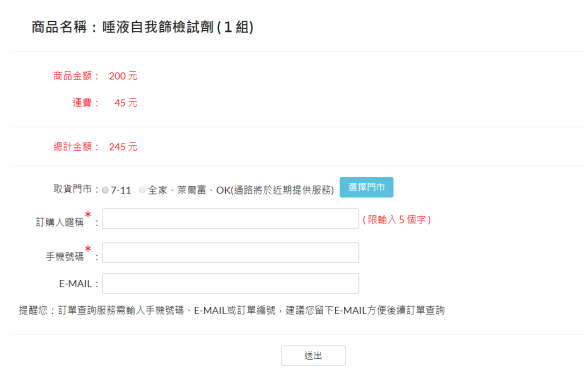
If you want to pay in cash, you can choose the option on the left for $245NT, and for people who register with their website, they offer vouchers.

As supplies are limited, you can get one per month. If you get tested elsewhere, leave these for people who are unlikely to get tested elsewhere or are in high-risk groups.

You’ll be prompted to enter your phone number (手機號碼) and choose a 7-11, FamilyMart or OK Mart branch near you (Click 選擇門市 and remember to turn off your popup blocker):
未命名

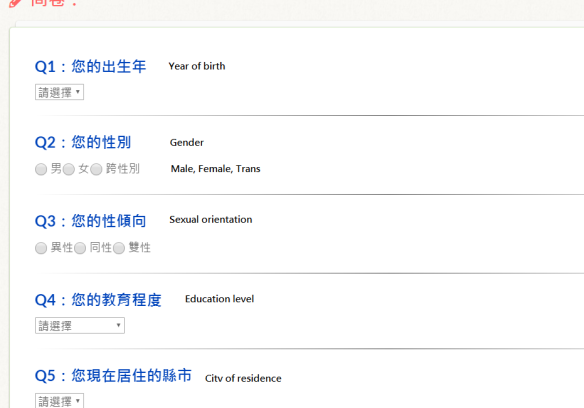
After you confirm, you’ll be asked to fill in a questionnaire:
未命名

Then it asks you where you lived before the age of 18 and you’re done, you just have to confirm the order a few times.

You’ll receive an order number via email and you can check the status of your order by entering your phone number, order number and email address.

How to use the test:

Here’s a quick video on how you go about using the test kit:

(My favourite line is “Don’t drink the liquid in the test-tube” by the way.)

95683818_838912133286284_7432974164572504064_n
Photo: Marcello Casal JR/ABr

If you don’t manage to register while stocks last, there are plenty of ways to get tested in Taiwan, whether anonymously or not, including visiting Gisneyland on the second floor of Honglou in Ximen (Facebook page here), using a vending machine (spotted throughout the city) or visiting a hospital.

There is also free anonymous testing (blood tests – takes a week or two to get the results) held around Taipei as follows:

These timetables are updated every month, you can find them here.

The most commonly occurring locations have been listed below:

Gay Health Center (同志健康中心), 5F, No. 100 Kunming Street, Wanhua District, Taipei (臺北市萬華區昆明街100號5樓) Note: This option is by appointment only

Mudan (紅樓(牡丹))(bar at the Red House drinking area in Ximen)

Soi 13   1 No. 13 Minsheng East Road Sect 1, Zhongshan Dist. Taipei (1, No. 13號民生東路一段中山區台北市104)

XL Club 4F, No. 10 Minzu East Road, Zhongshan Dist. Taipei (4樓, No. 10號民族東路中山區台北市10491)

Taipei Men Center (城男舊事心驛站) 3F, No. 5, Alley 199, Dunhua North Road, Songshan Dist. Taipei (105台北市松山區敦化北路199巷5號 3樓)

Han Sauna (士三溫暖) No. 120 Xining South Road, Wanhua Dist. Taipei (108台北市萬華區西寧南路120號)

Note: 「人力調度,篩檢暫停」 means that due to personnel adjustments, screening is suspended.

If the result turns out positive, there are several avenues to pursue treatment. Dr. Stephane Ku (顧文瑋) does consultations at Taipei Veterans General Hospital on Wednesday evenings (感染科), where you can get tested, explore the possibility of going on prep or get treatment.

If your partner is living with HIV, you may also qualify for a new government PREP program, which allows 30 pills per month for the female spouses/partners of people living with HIV and 20 pills per 3 months for the male spouses/partners under 35 years old of people living with HIV.

Can I file my taxes using my NHI card? Yes

In a previous post I talked about how you can order and pay for masks online using an e-reader and your NHI card. You can also pay your taxes using your NHI card. If you ordered masks using the system, you’ve already set up your NHI card for use and you can skip this post. If you didn’t you’ll need an ATM-style card reader and some patience.

(Note: If you’re about to renew your ARC, plan to do your taxes before the renewal or after, as your details may not be accepted while your renewal is being processed, according to NihaosItGoing.)

(You can also use your Alien Citizen Digital Certificate if you have one, and the process will be exactly the same except you will be asked to enter your pin).

First things first: Install your card reader

After you’ve installed the card reader, head to their website, if you’re a Windows user, you’ll need to download their Windows installer, or MAC Installer, (others available here). You can check if your card is being read properly here.

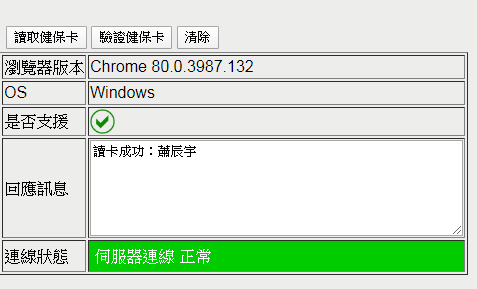
If it’s working, you should get a message like this:

76917362_433885400836442_4556499661518536704_n

You’ll also have to mark your server as a trusted server on this page). You’ll have to be an administrator on your computer to do this.

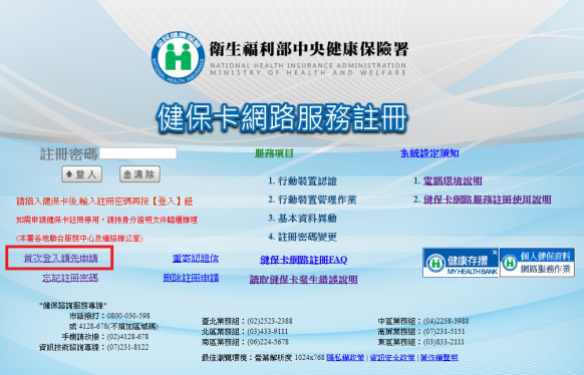
First-time users should click the box labeled 「首次登入請先申請」(First-time users, please apply here first), which I’ve marked with a red box below:
(Note they’ve now added English to the website too.)

76917362_433885400836442_4556499661518536704_n

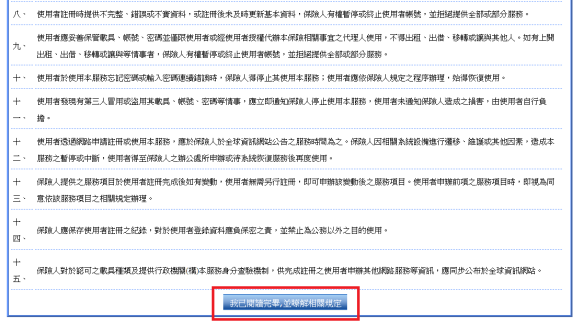
This will take you to a list of terms that you can click agree on:

76917362_433885400836442_4556499661518536704_n

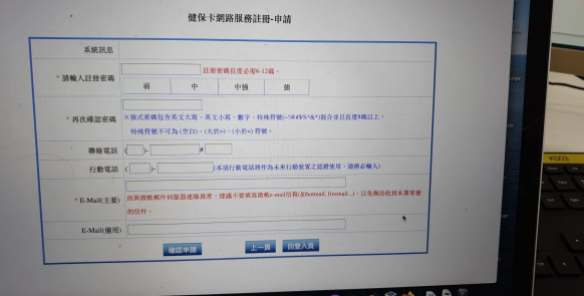
At the minute it seems like the NHI have added an extra security precaution so that you have to enter your 「戶號」. However, if you press 「讀卡」 (read card) on this screen, it should take you to the page below, where you’re prompted to fill in your ARC details (on an ARC owned by the Vietnamese spouse of a Taiwanese person apparently):

89830922_210982496979081_4301641039522824192_n

That should take you to a screen like this where you set your password:

89690141_678057436270113_8205935636377501696_n

After this you’ll have to confirm your email address:

89672804_251278529219297_1523827583139971072_n

Expect to get quite frustrated with your card reader throughout this process.

Once you’ve registered your email, and verified it and set your password you’re ready to use your NHI card for to file your taxes.

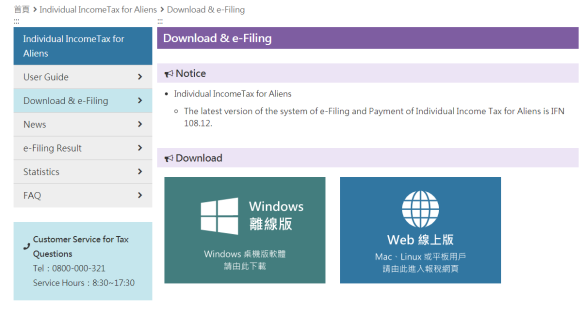
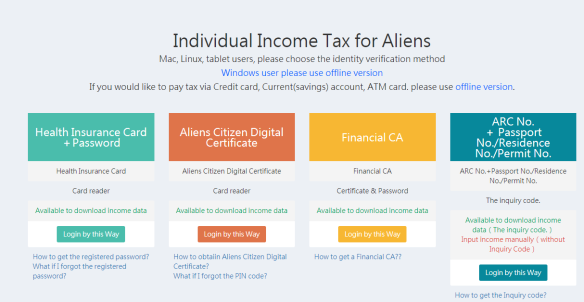
First go to this website:

未命名

File Offline Then Upload (PC Windows Users Have to Choose This)

And click the turquoise button to file your taxes offline and then upload them or the dark blue button (Web線上版) to file your taxes online.

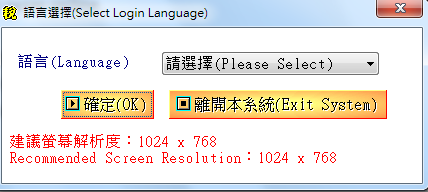
If you chose offline, you’ll get a program downloaded on to your computer. Once you open it, you get asked if you want to proceed in English or Chinese. The advantages of English is that it’s quicker to read, but the advantages of Chinese is that it matches all the jargon on your documents:

未命名

Then it will check a few more things and you can just click 「確認」 or “Confirm”.  It will also ask you if you want to check for the latest version. Unless you already had it on your computer, you can just say “no” and proceed at this point.

If you get an error at this point telling you that today’s date is not valid, visit my troubleshoot post here.

Next it will ask you what year you want to file for – this should be 108 or 2019, depending on format and you should choose Taxpayer.

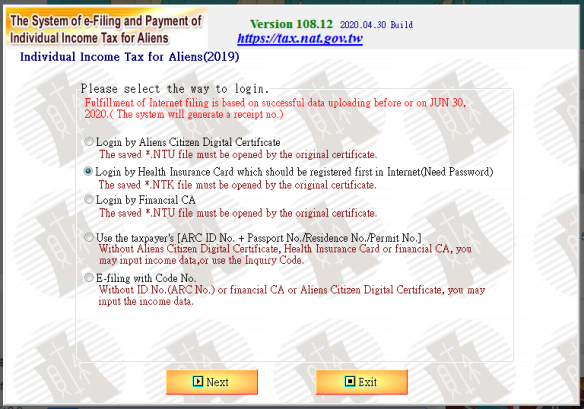
The next screen will ask you how you want to login. (You can login with just your ARC number, but this means that you’ll have to enter all the data yourself.) So if you’ve got your card-reader fired up, stick in your NHI card and choose NHI card and password:

未命名

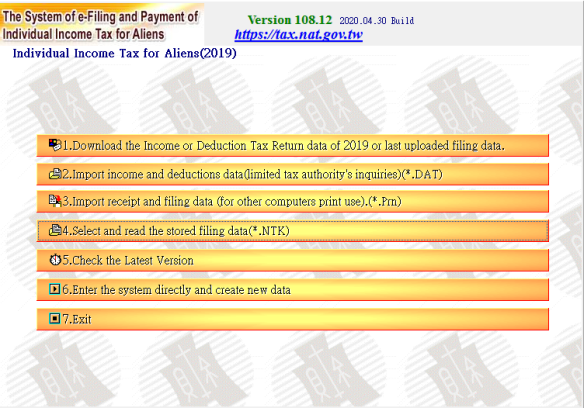
Next you’ll be prompted to enter your ARC number. After that the following screen will up and you should choose the first option (to download info on tax withholding and deductions):

未命名

(If you just have your ARC, you can click 6 here and begin entering your data manually.)

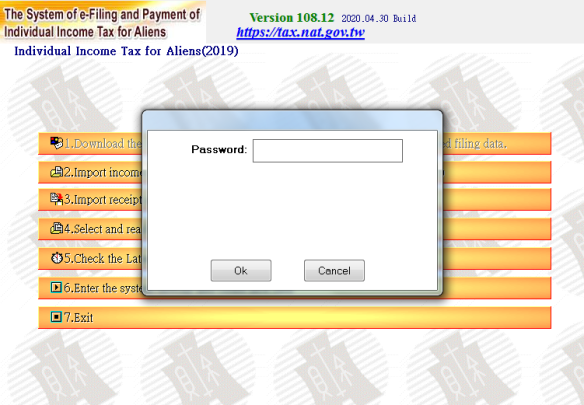
For those with card readers and NHI cards, you’ll be prompted to enter a password. This is the password that you used when setting up your NHI account above. (It’s also the password you have to enter on your NHI app every time you login:

未命名

You’ll get a few more intermediary screens saying that the info is just for reference. Including two report previews which you can read and then close to proceed.

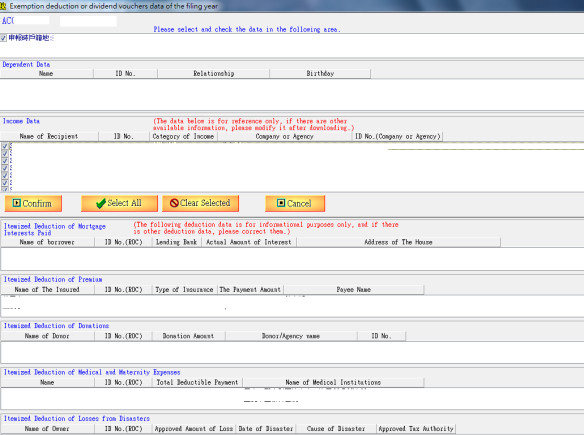
You’ll then get to the list of deductions and the withholding information, which should look something like this, but with data filled in:

未命名

This is a list of all your income, including salary and bank interest, and below is a list of different kinds of deductions. If you’re satisfied you can select all and confirm.

Now you come to the tax form proper:

未命名

You should see your income info and refund listed in the top right corner. The rest of the information you’ll have to fill out yourself.

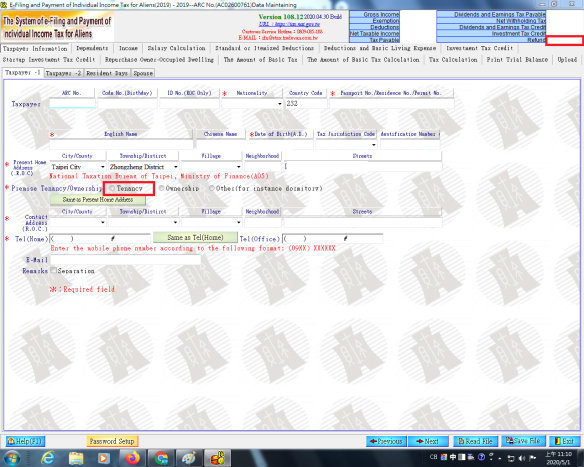
The next sections are reasonably straightforward, and most of the info is auto-filled or blank. Unless you have a spouse and are filing together or dependents.

You can go for itemized deductions if your itemized deduction is above NT$120,000, which is the standard deduction, on the deduction page.

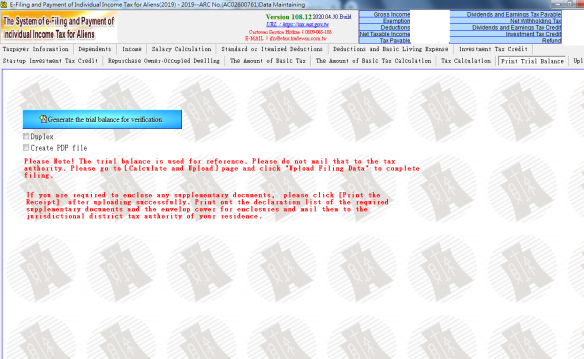
If you’re on your way to your APRC, make sure to print the statement, here. As you’ll have to mail in a copy to get your certificate:

未命名

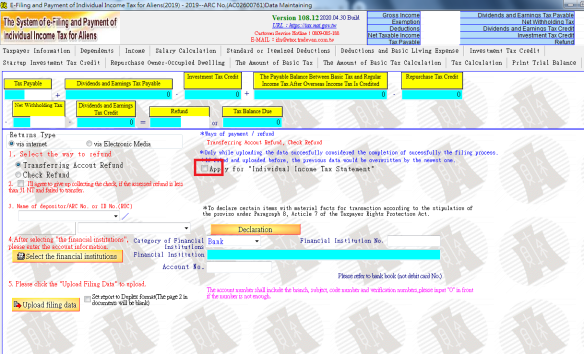
Next you pick how you’ll get your refund and if you want to apply for the tax statement, make sure to tick the box:

未命名

You can choose check or bank transfer, I suggest the latter (you’ll have to fill out your bank identifier number and your account number then you can “Upload filing data”.

Remember to print the docs or save them to print later, if you want to apply for a tax certificate. You’ll have to mail a copy of your tax filing and then the certificate will be mailed to you!

File Online (Mac and Linux Users)

If you chose online, it should take you to this screen and you can choose the NHI Health Card and password option:
未命名

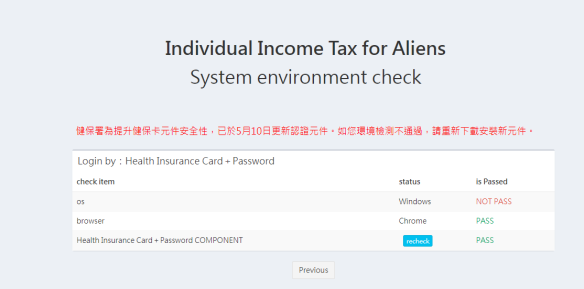
If you’ve got everything set up and you get this message:

未命名

This is because you’re using a Windows system, so you’ll need to use the offline method described above.

There is a message in Chinese saying that they’ve updated the systems on May 10 (the future), so you need to download the new component. Maybe this will change the game in terms of Windows users? *shrugs*

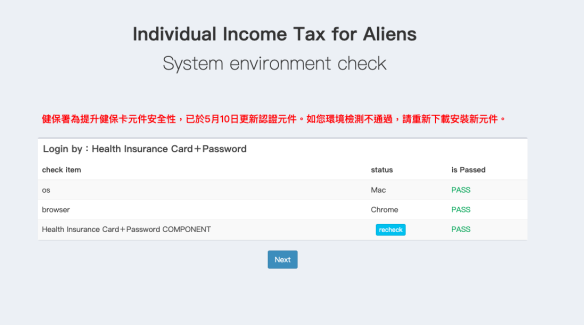
So I used the online system successfully on a Mac this evening:

Screen Shot 2020-05-01 at 8.23.57 PM

After this it is essentially the same process as the offline version for Windows.

Installing an ATM-style Card Reader

So you want to install a card reader on your computer. Maybe you need it to use your bank’s web ATM services or to file your taxes. For the purposes of this post I’ll be using this card reader (EZ100PU ATM 自然人憑證 晶片讀卡機), but other brands should entail a reasonably similar process.

The card-reader comes with a setup mini-CD, like this (don’t have the CD or too young to have a CD drive? Skip to the section below to find the driver online):

95256852_264919374537831_6765973916826468352_n

As these disks are quite small, if you’re putting them in your CD drive, ensure that they’re placed exactly in the center, or they may not read properly.

Make sure your reader is not plugged in and then open up the DVD drive folder:

未命名

Then just click on the driver that applies to your model, and you’ll be guided through installation process by the install wizard.

Eh… what’s a CD drive? (If you have a CD drive, you can skip this bit and rejoin us at the component section).

Finding the driver online

For gen Zers who won’t have a CD drive on their computer, you can also download the driver from the company website. Obviously, this depends on the company, but googling the model number and “driver” (驅動程式) will normally turn up the company’s drivers. For the card-reader I used, you can find the driver here. Go to the PC/SC External IC Reader section and select the driver compatible with your system. If you don’t know whether your system is 32 bit or 64 bit, open any folder, then right click on the MyComputer icon and click “Properties” and you’ll get a list of information showing you which your computer is:

未命名

Once you’ve downloaded the file, open your downloads folder, and you should see a zip folder called something like “EZ100_Driver_64bit”. Right click it and select Extract All. The decompressed folder should appear. Open it up and and click “setup.exe”

A pop-up will appear asking you to confirm, and you should click “Run”. Then another dialogue box will open asking you to select a language, if you want English, scroll down until you see English (英語)then you’ll be guided through the install process (make sure you’re an administrator on your computer). Once you’ve successfully installed it, on a Windows PC, you’ll get a little dialogue box in the bottom right corner, saying something like this:

未命名

Components:

Once you’ve installed your e-card reader, depending on what you want to use it for, you’ll need to download the relevant component to make it work for the specific purposes you’re after:

For use with the NHI website, you’ll need to visit this page to get your component and verify the server. If you’re a Windows user, you’ll need to download their Windows installer, or MAC Installer, (others available here). You can check if your card is being read properly here.

To file your taxes using your NHI card go here.

Various banks have their own components for WEB ATM which you can download from their websites:

Megabank

E Sun

Fubon (Click 元件下載 at the bottom).

I’m Applying for an Alien Citizen Digital Certificate (but just for the craic)

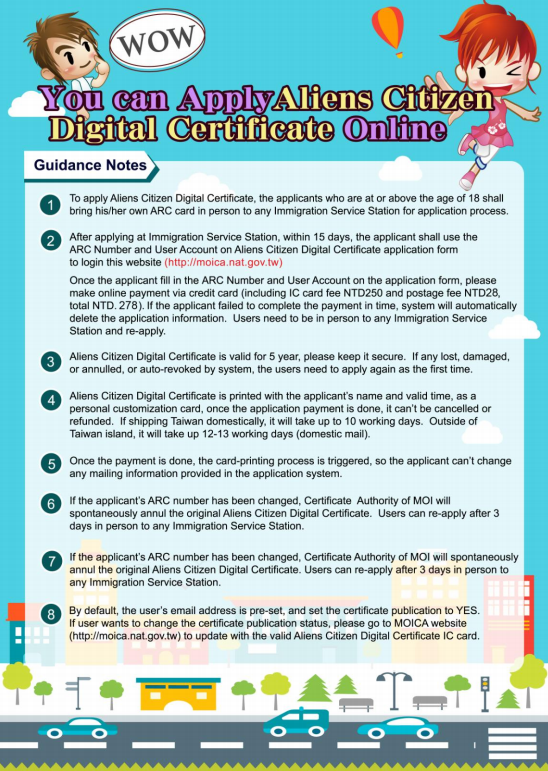
I guess I’m missing queues at the Immigration Office after getting an APRC or am super motivated to find things to do other than the long-term project I’m supposed to be working on, but I went and applied for an Alien Citizen Digital Certificate on April 24. I plan on documenting the “journey” here:

78338641_544839276063657_29951216431661056_n

Don’t be fooled by the heading by the way, you can apply online after you go in person to the immigration office with your ARC/APRC, so not technically all online.

The ID can be used for filing taxes (although you can also file taxes without it) and for various government websites and systems, giving you access to information and allowing you to apply for things online. For Taiwanese people it also means they can apply for bank accounts and credit cards online, but I’m not sure that applies to foreigners, but we’ll see. The cost of the card is NT$275 and it lasts for 5 years (subject to your ARC being valid).

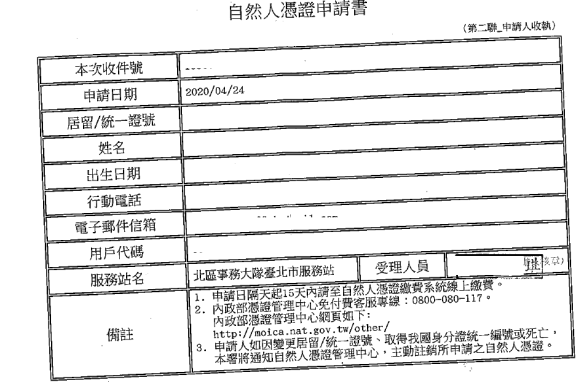
April 24: Today was pretty simple, brought my ARC (no photocopies required) to the National Immigration Agency (the ground floor in Taipei where you go to apply for your ARC) and then wrote down my phone number and email address and gave it to the lady (after fielding a quizzical look from her), who then made me sign a form and then gave me a sheet of paper with the following information on it:

000000000000000000000000000000000000111

The key bit of information is the 用戶代碼 (username) which you’ll need to log in to the site. She said to wait for the letter to go through, so I’ll give it a few days. It says on the website one working day, so we’ll see.

You have to pay within 15 days through the system or you will have to apply again. If you make changes to your ARC (including the number) you have to apply again.

April 27 Update

I paid for the card last night on the website. If you have trouble accessing the website, make sure to delete the www. from the address bar.

Click ‘Application Progress’ on the left side and you’ll be prompted to enter your ARC number and your 用戶代碼 (username). If it’s been approved, it should give you the option to pay by credit card. And then it will link to a page where you enter your credit card information. Once that’s done you’ll just have to fill in/confirm more details, like postal address and phone number. Then press save.

April 29 Update:

When I looked up the website today it said it was in the mail and they even provided the parcel number, so that I can track it on the Post Office website:

未命名

May 5 Update:

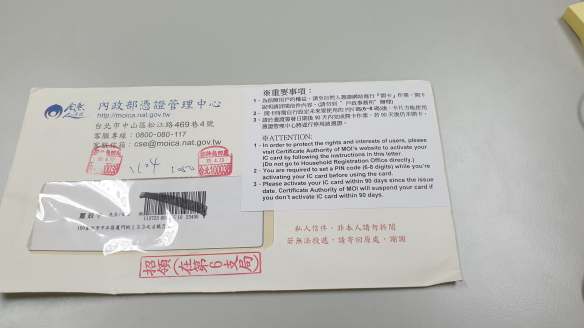
The card finally arrived (it went to my home address, so had to wait for three unsuccessful deliveries before I could go pick it up):

95884928_222732232356122_5648513878418522112_n

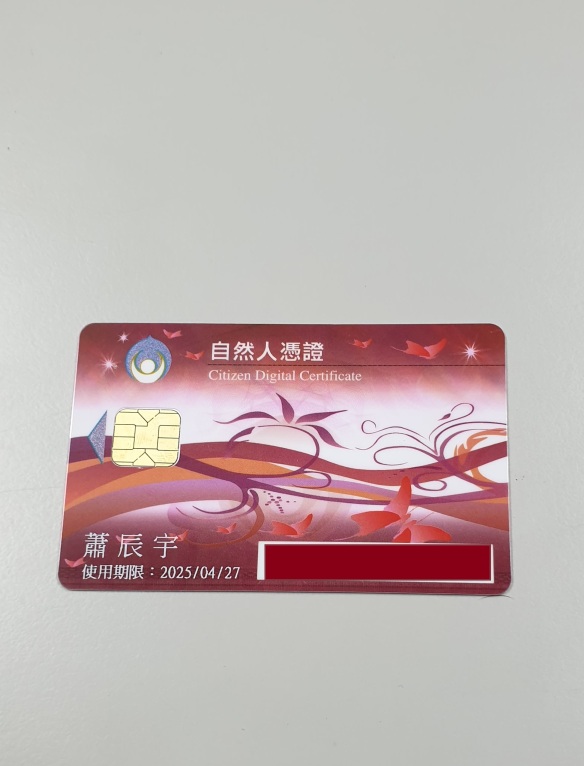
So here it is:

96047630_339607313691025_5235719529308356608_n

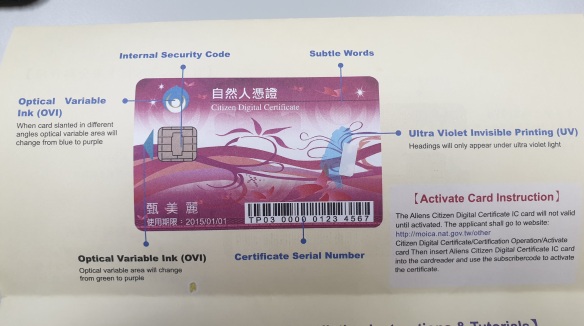
The various security/design elements are listed in the letter it comes with:

96042981_3053769394682292_558729035656462336_n

Now to unlock it:

If you’re using Microsoft, you need at least Microsoft Windows XP Sp3, a card reader (learn to install one here) and then download and install the HiCOS digital certificate management tool at this website (you have to restart your computer so prepare for that).

So, this bit was a little complicated, and I ended up having to ring them to activate my card…. BUT hypothetically, the next step you take is to navigate to this website, where you can activate your card (the pin is supposed to be your year and month of birth in the format YYYYMM), although it says in the letter you only need your subscriber code (which is on the printed piece of paper you got at immigration. If you have trouble accessing the website, insert your card first and then try opening it. If you still have trouble try opening the link in another tab, and if you still have trouble use IE explorer.

Once you’ve activated your card, you can change the pin at this website. You just need the subscriber code and your card reader.

Then you’re all set.

To use the government’s FIDO app to use your phone to verify your identity, see this post.

What can you use the card for:

Applying online to the National Immigration Agency for a printable certificate of entry and exit dates.

Read Google Play Books on your Kindle

book-2135769_1920This is an unnecessarily complex way to convert your Google Play book to a Kindle readable version. Why don’t they make their systems interoperable? (Sigh!)

Go to Google Play Books:

Step 1: Click ‘My Books’

Step 2: Hover over the book you’ve bought in Google Play and click the ︙ button.

Step 3: Select download ePub and download it to your computer.

Step 4: Install Adobe Digital Editions (yes, you really have to do this).

Step 5: Once you’ve setup an account, go to ‘File’ and ‘Add to Library’, then select the file you just downloaded and open it.

Step 6: Go back to Library

Step 7: Download Calibre (yes, you also really have to do this.)

Step 8: Download DeDRM Tools (shhh… just do it) and extract files.

Step 9: On the main screen of Calibre, go to Preferences, and then click Plugins, under the Advanced Tab.

Step 10: Click ‘Load Plugin from File’ and select the DeDRM Tools file you just downloaded and extracted.

Step 11: Restart Calibre and Click ‘Add Books’, and select the downloaded file from My Digital Editions

Step 12: Select ‘Convert Books’, and select MOBI as the output file type.

Step 13: On the right of the Calibre app there should be a Path: Click to open link. This will lead you to your newly created MOBI file, which you can transfer to your Kindle.

Step 14: You’ll generally have an email that you can send files to, or you can just do it the old fashioned way via USB.


E-reading Chinese-language books in Taiwan: Frustrations Galore

Taiwan has been quite slow to get into the e-books game, but over the last few years, more and more titles are being made available on a range of platforms. Although there is a range of reading devices available, I’m going to look only at e-books available on the Kindle (the only dedicated e-reader device in my possession) and on various mobile phone apps.

A word of warning, expect to be slightly disappointed. The industry seems largely to be dragging its heels, preferring traditional paper copies to digital copies (cue a junior lecturer’s lesson plan on Walter Benjamin). I’m not sure if this has to do with copyright law or if there’s just a general fuddy-duddyness. Anecdotally speaking, I’ve seen a lot of people reading martial arts novels and lots of manga on their phones in the MRT.

Kindle: I was actually surprised when I was gearing up to do this blogpost, how many Taiwanese books are available on Kindle if you search for them. That is the catch though, you already have to know what you’re looking for. Once you do manage to get your book on to the Kindle, it works quite well.

The other options available that I’ve seen are Google Play Books, MyBooks or eBook – the eBook reader launched by books.com.tw (and there’s also ReadMoo and Kobo rated below in the table). Even here, older but famous titles (like 《孽子》  for example) are hard to find. If you know of any other stores let me know in the comments section.

Continue reading

Easycard Wallet: Not (yet) for Foreign Residents? (March 26: Update)

The Easycard Wallet which could previously tell you your card balance and display your receipts has had a revamp. You can now use the app to make purchases instead of fishing out your Easycard. Unfortunately, you won’t be able to register for the pay function without a Taiwanese ID until the end of May according to a Customer Service representative (ARCs do not meet the required format and no alternative is given for foreign residents to sign up.)

90560343_211054943575330_931557116349513728_n

A customer service rep sent the following message, saying that foreign residents will be able to register for the app starting at the end of May. They’re phrasing it like it was a planned rollout as opposed to just bad programming and lack of forethought, but hey… it’s something:

您好:

謝謝您的來信。

有關持居留證者申請悠遊付一事,本公司預計5月底開放,屆時歡迎提出申請。

或建議您可加入本公司facebook粉絲團或LINE官方帳號或留意本公司官網的最新消息,日後您即可接收最新資訊。

以上說明,謝謝~

Thanks to Slava for the tip!

June 3 Update: The app was updated on May 29 to allow foreign ARC holders to sign up as the company promised, more details here.

Selling Things Through Family Mart

Not an expert at this, but a commenter asked for a guide to using Family Mart to sell things. I’ve never sold on the platform, but thought I’d try and help out.

The main website is here.

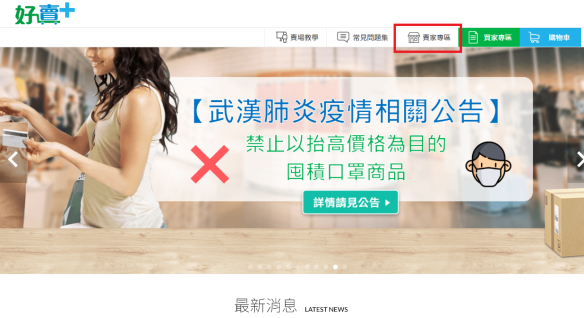
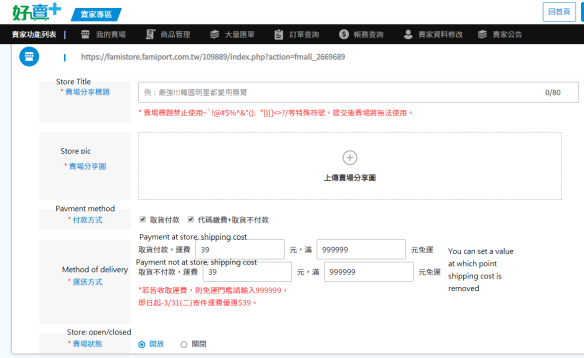
If you’re selling something, you’ll want to click on 賣家專區 (Seller Section) highlighted in red below:

78852963_432105811064472_3013637758280269824_n

You’ll get an error message and will be redirected to this page, prompting you to register/login. The page asks you to enter your phone number as below:

76917362_433885400836442_4556499661518536704_n

Once you enter it, they’ll send an SMS to your phone to prove you’re the owner of the phone, and then they’ll prompt you to set a password for your account.

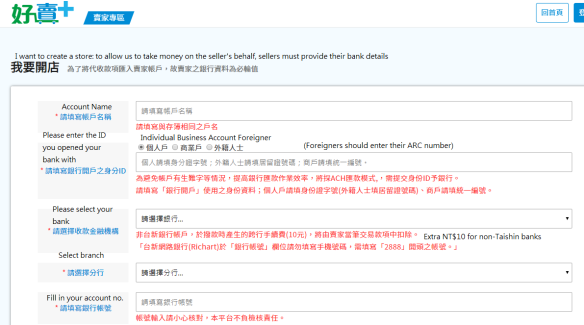
Next up is this page:


76917362_433885400836442_4556499661518536704_n

This is easy enough, just fill in your account name (should be the name on your bank account), make sure you select 「外籍人士」 then fill in your ARC in the ID section, then select your bank, branch (your branch code is normally the first few numbers of your account no. for E Sun bank account holders) and fill in your account no.

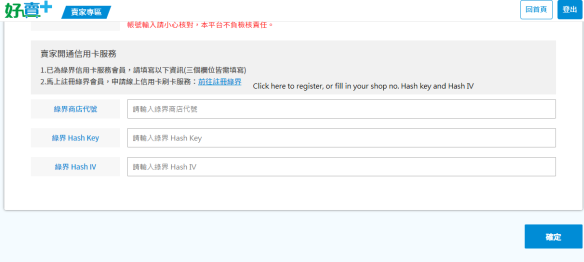
The second bit of this page, is for those who want to be able to have credit card payments received on their behalf. So you can sign up for ECPay (綠界科技)for free if you want:

76917362_433885400836442_4556499661518536704_n

I’m not going to sign up for that for this demo, but partner banks are listed here.

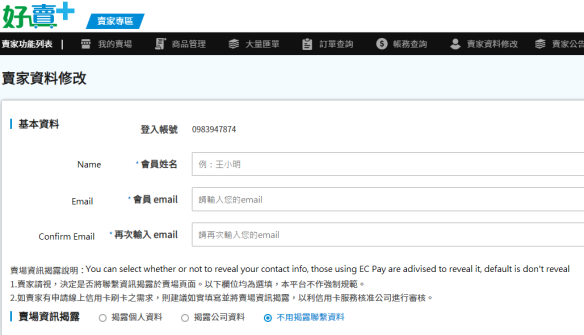
After that you’ll get a message telling you to check your account name in case there are any errors, but there should be a follow-up message congratulating you for setting up a store. Then you’ll come to the personal information disclosure screen. It will ask for your name, your email (twice) and at the bottom it will ask you if you’re willing to disclose your personal information. (The first option is disclose individual info, the second is disclose company info and the third is don’t disclose – which will be highlighted in blue and is the default choice):

未命名

From here, you can add a store:

未命名

From here, you’ll be able to name your store:

未命名

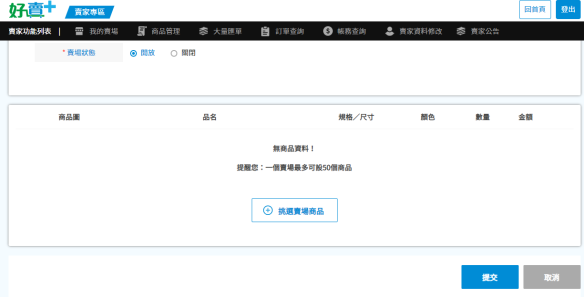
Then you can list your products:

未命名

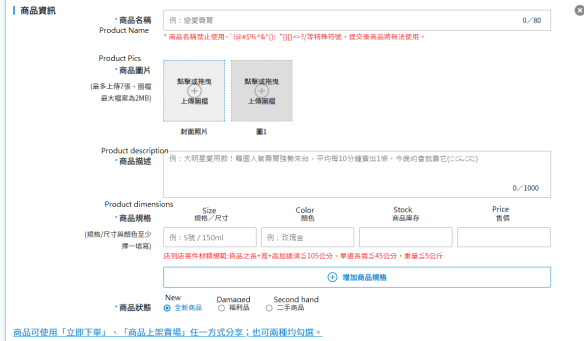
You’ll be prompted to fill in information about the product you wish to sell:

未命名

Once you sell something, I’m assuming you get follow-up instructions.

Anyway, that was for Sue, if you have any follow-up questions, feel free to write again.

Order and Pay for or Donate Masks Online and Check your Medical History with the NHI App 用全民健保行動快易通app買口罩註冊辦法

Germany

36th Round:
Order and payment: June 14-16
Collection: June 21-July 4

**Update the new update of the app now has a COVID-19 (NHI-funded) vaccine appointment platform. It’s still under construction, but watch this space.**

I discovered this app a while back, but it wasn’t really of much use to me until I heard the news that you can order masks through it on a weekly basis. The app essentially provides you information about your medical history and medications prescribed you online, and they’ve added information about all the tests you’ve undergone through the years in English (See Extra Credit section below to explore this content). It also provides reminders about scheduling your next dentist appointment, but previously, the app was buggy and not incredibly interesting, so I didn’t blog about it at the time. The process of getting your device verified is also quite complex and involves a card reader, so I didn’t think there’d be too much appetite for a post about it, but maybe the online ordering system and the added info will change that a bit. (Note, you can also order at an iBon/Famiport/other machine in convenience stores and pay at the counter.)

After downloading the app 「健保快易通」(Google Play) or here for Apple users (if you’ve already downloaded it, make sure you have the latest version). You then have to go to the website to verify your identity with a (ATM-style) card reader (you can buy them on PCHome here).

After you’ve installed the card reader, head to their website, if you’re a Windows user, you’ll need to download their Windows installer, or MAC Installer, (others available here). You can check if your card is being read properly here.

If it’s working, you should get a message like this:

76917362_433885400836442_4556499661518536704_n

You’ll also have to mark your server as a trusted server here (or click on 「設定伺服器為可信任服務」(set as a trusted server) on this page). You’ll have to be an administrator on your computer to do this.

Now, you can get on with verifying your mobile app.

First-time users should click the box labeled 「首次登入請先申請」(First-time users, please apply here first), which I’ve marked with a red box below:
(Note they’ve now added English to the website too.)

76917362_433885400836442_4556499661518536704_n

This will take you to a list of terms that you can click agree on:

Continue reading

Updated: Top Up Your Easycard Automatically From Your Bank Account

If you haven’t already tied your electronic receipts on your Easycard or with your mobile phone barcode to your bank account, you can check out my previous how to blogpost.

For those that have already done that, you might want to set up your Easycard so that when the balance hits zero, NT$500 is automatically transferred from your bank account  (see participating banks below*) to the Easycard. The service can be cancelled if you lose your card, and you can recoup the balance of your Easycard when you cancel the card.

*Participating banks: Fubon; Shin Kong; Mega Bank; Taishin Bank; CTBC Bank; COTA Commercial Bank; Union Bank of Taiwan; Jihsun Bank; Chang Hua Bank (UPDATE: as of March 11, 2020 – see here for updated info!)

Currently banks like E. Sun offer a debit card with an in-built Easycard, if your bank supports this service then great. If not, you can follow the instructions below to tie ordinary Easycards to your bank so that you never have to top up your Easycard with cash:

Step 1: Register your name to your Easycard at the following website:

Website Link

To do this you need to click on 「記名申請」(Apply for name registration)

1233333

Several terms and conditions will be listed on the next screen and you can click 「確定」 (Confirm), as below:

Untitled

After this you’ll be asked for the Card No. of your Easycard, generally found on the bottom right of the back of your Easycard. It asks you to enter it twice. You’ll also have to complete a captcha puzzle and press 「確定」(Confirm) again:

Untitled

The next screen will ask you to fill in some details, including your name, email and phone number. Following this there will be a screen telling you to upload a photo of your ARC (and sometimes the front and back of your Easycard). When you’ve done this, you’ll get a screen telling you that it’s processing.

It takes 3 working days to process.

2. Go to your bank

Once you get an email notification, confirming that the name registration process is complete, you have to go to your bank and fill out a consent form. You’ll need to bring your ARC, your bank card and your Easycard with you.

3. Go to a Famiport

Once your bank has processed your form, they will allow you to activate the automatic top-up function. You can do this by going to a FamiPort and clicking the 「悠遊卡」 option, listed under the purple print section:

111223
111223

Under this you should see an option called 「帳戶連結設定」(Account Link Settings). It will ask you to put your Easycard on the sensor and then it should activate your automatic top up service.

Note: All of the banks listed below allow you to incorporate your Easycard into your debit card. So the method listed above is just for those that didn’t opt for that service, are with banks that don’t support these services, or are just very attached to their current Easycard:

111223
1233333

When you’re issued with an combination Easycard/Debit Card, you’ll have to activate the automatic top-up using a Famiport too, but you choose a different option under the Easycard menu as below:

111223

Then, as with the account link settings, you’ll have to put your Easycard to the sensor and confirm that you want to activate the service.

Post was updated March 11, 2020, to reflect the other banks who have since joined the scheme!